Topics Map > PAWS
PAWS - Online Payment/Billing
Pop-ups must be enabled/allowed.
PAWS charges may be paid online through your PAWS account. Electronic checks (eCheck), VISA, MasterCard, and American Express credit cards are accepted on PAWS.
Each PAWS online Credit Card transaction will be assessed a 2.85% non-refundable convenience fee. The convenience fee will not appear on your PAWS account but will appear on your credit card statement.
No convenience fees are charged for ACH (Electronic Check) Payments, mailed payments, or in-person check payments made in the Office of Student Accounts.
How to Make a Payment Using PAWS
- Log into PAWS.
- Click on the Make a Payment link below the Account Summary in your PAWS Student Center.
- Log into the NelNet QuickPay site, previously called TouchNet. Click the View & Pay Accounts navigation link.
.png)
Follow the Payment steps to complete the Payment via ACH (Electronic Check) or Credit/Debit Card. Once the Payment is Complete, you will be able to save/print a receipt from the Quick Pay site. The payment will be reflected on your Student Account in PAWS.
Have a payment question?
Direct payment questions to the Office of Student Accounts,finances@uwm.edu, (414) 229-5789, (414) 229-4601, or Mitchell Hall Room 285.
How To View PAWS Online Billing Statement
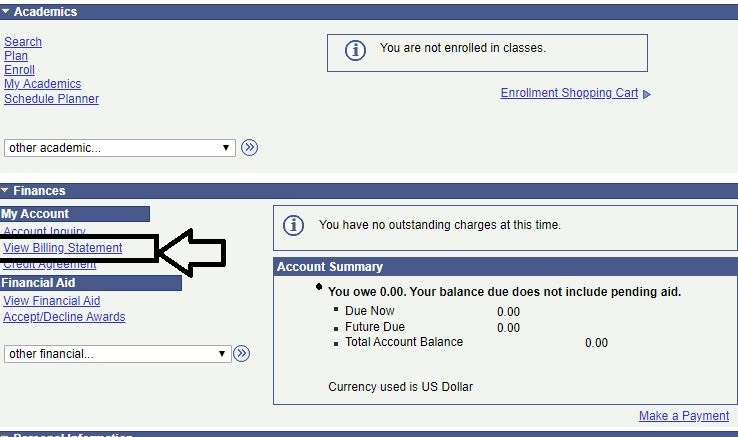
Students will now be able to view an online billing statement on their PAWS account by clicking on the "View Billing Statement" link located on the Student Center page under the Finances section and then clicking the "Get Billing Statement" button.

When they click on the Get Billing Statement button, the statement that displays will be in PDF format so the student can view it, print it, or save it as a file on their computer. This online statement has been tested on PCs, Macs, and Linux (all with Adobe Acrobat of 7 or higher). It also works with the most up-to-date versions of our supported browsers.
Allowing others to access your PAWS account for payment
For Authorized Payers
To Access Nelnet payments through your designate accounts
- Sign into your designate account.
- Click the arrow next to Self Service, then Campus Finances, then Make a Payment.

- Click the Authorized Payer Link (for screen readers, this will read as Transaction Date).

- Make your payments within Nelnet.


