Respondus Exam Manager - Add Questions to a Respondus File
The article describes how to use the Edit menu in Respondus 4 to add and manage various types of questions in a quiz, including Multiple Choice, True or False, Long Answer, Matching, Short Answer, Multi-Select, Ordering, Fill in the Blanks, and Arithmetic questions. It explains the common features across all question types, how to provide feedback, and how to save and reorder questions within the quiz file.
Introduction
The Edit menu allows questions to be added to the currently open file. There are nine types of questions:
- Multiple Choice,
- True or False,
- Long Answer,
- Matching,
- Short Answer,
- Multi-Select,
- Ordering,
- Fill in the Blanks and,
- Arithmetic.
To complete these instructions, you must already have a Respondus file created or opened.
Create a New Question
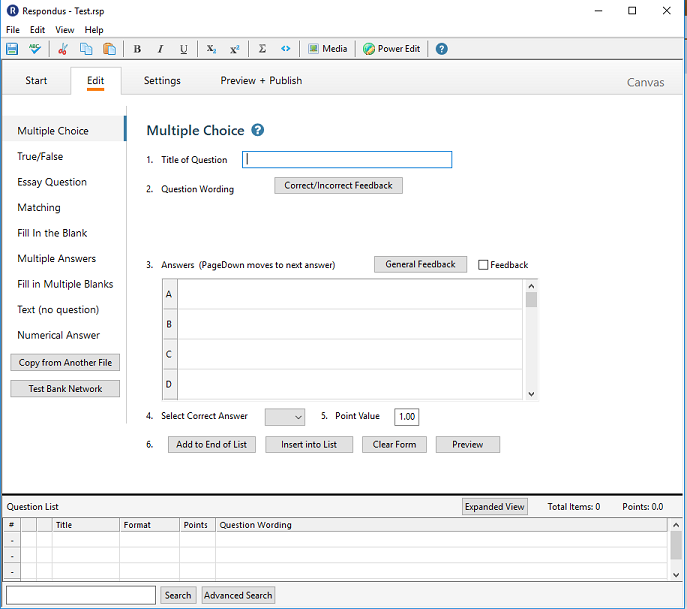
To create a new question, select the desired question type on the left side of the screen. The entry template on the right side of the screen will change accordingly.
Question Types
- Multiple Choice - Multiple Choice questions can have up to 26 answer choices, but only one correct answer can (and must) be selected. You must also provide a point value for each question (the default setting is “1”).
- True or False - Enter the statement in the question wording field and then select either “True” or “False” as the correct answer.
- Long Answer - Long Answer question types allow students to enter complete sentences or paragraphs for their answer. A correct answer can be entered for feedback purposes.
- Matching - Matching questions require students to match items from two columns.
- Short Answer - Short Answer questions require students to enter a word, short phrase, or string of characters. Since the computer automatically grades the answer, students must give an answer that exactly matches one of the answers provided by the instructor.
- Respondus does not support entering D2L Regular Expressions as answers
- Multi-Select - The Multi-Select question type is very similar to Multiple Choice, except that students can (and generally should) select more than one correct answer.
- Ordering - Ordering questions allow students to provide an answer by selecting the correct order the answers are to appear. Enter the question wording or statement in the Question Wording field and then enter the answer choices in the correct order. Finally, enter a number indicating the order in which you want the answer choice displayed in the narrow column to the left of each answer.
- Fill in the Blank - The Fill in the Blanks question type presents students with questions that contain multiple blank spaces that must be filled in.
- For each blank that you want to appear in the question, you most enclose the correct answer in square brackets.
- Arithmetic - Arithmetic questions require students to apply a mathematical formula to answer the question. Arithmetic questions are designed using variables.
Common Features Across all Question Types
- All question types require a Title. The title can be up to 64 characters. If you do not enter a title, Respondus will use the first 20 characters from Question Wording.
- All question types have a Question Wording section. This is where the main body of the question is entered.
- All question types allow the entry of feedback.
- If feedback is enabled for a particular exam, students will see the feedback for the answers they selected after they submit their answers.
- To enter feedback for a question, select the Feedback option on the edit form. The form will then display fields, directly below each answer choice, where feedback can be entered. “General Feedback” can also be entered by clicking the General Feedback button and entering the desired information.
- If you deselect the Enable Feedback checkbox on the side of the screen, all feedback remains stored with the question.
Save the Question
Use the "Add to End of List" or Insert Into List buttons to add the question to the list of questions for the file.
Four buttons appear at the bottom of all edit forms.
- The "Add to End of List" button adds the current question to the end of the “Question List” (located at the bottom of the screen).
- The Insert Into List button lets you insert the current question into the Question List at a specified location.
- The Clear Form button will erase all data that currently shows in the form.
- Finally, the Preview button opens a browser-like window that lets you view how the question will appear in the final exam--feedback and scoring information is also shown in this window. The Preview button can be selected at any stage in the editing process.
Re-Ordering Questions
The Question List at the bottom of the Edit screen displays the title, question type, points, and question wording for each question in the file. The menu button in the next column will display a pop-up dialog with various operations that can be performed on that item.
- Click Move To # to move a question to different location in the list.

Example:
Question A is in row 1. Question B is in row 2. To move Question B before Question A:
- click the Menu icon for Question B
- click Move to #.
- A window will open. Enter the position the question should move to. Then click OK.
This article is based on documentation provided by Respondus and is re-used with permission.

