Office 365 (Outlook 2016 for Windows) - Send mail using your alternate address
There may be times where you need to send email using an alternate address.
Important: These instructions assume you have already configured Outlook 2016 to your Office 365 account. If you have not already configured Outlook 2016, please see our guide.
Configure your alternate address
- Open Outlook 2016.
- Go to "File" menu/tab.
- Select Add Account from within the 'Account Information' menu.
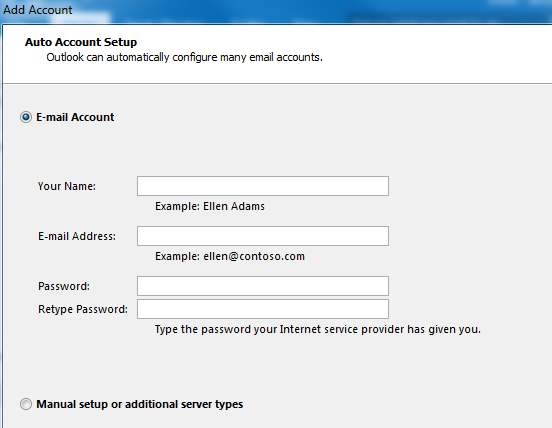
- Fill in your account information on the 'Add Account' screen and click Next.
- On the 'Account Setup' screen, select Manual setup or additional server types (located at the bottom of the screen) and click Next button.
- On the 'Choose Service' screen, select POP or IMAP and click Next button.
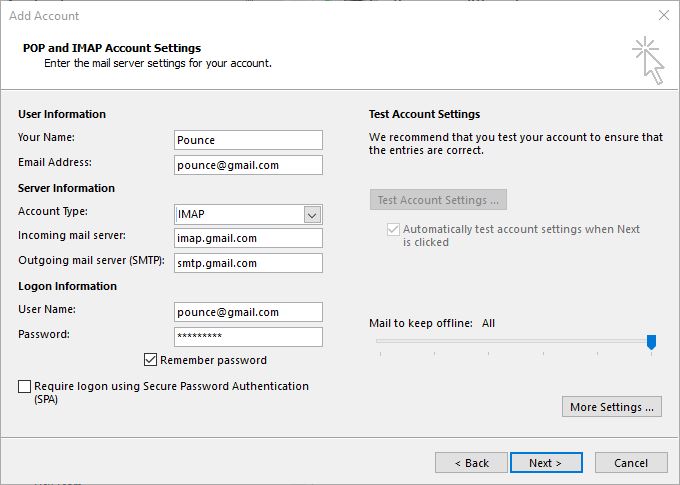
- On the POP and IMAP Account Settings' screen, fill out the required text fields:
- "Your name" is the display name associated with this account. It will be presented to the recipient.
- "Email address" is the address that you added to your account in Office 365.
- "Account Type" should be POP3 or IMAP, based on whichever protocol your alternate address uses.
- "Incoming Mail Server" should be set to the URL of your email service's incoming mail server.
- "Username" should be the username associated with this account.
- "Password" should be set to the Password of your alternate email.
- Untick the option "Automatically test account settings when Next is clicked".
- Click More Settings... button.
- Click on the Outgoing Server tab and place a check mark within the "My outgoing server (SMTP) requires authentication" box.
- Click on the Advanced tab and then change the "Incoming Server" "Outgoing Server (SMTP)" setting to the correct port numbers and set the encryption type.
- Click OK button to return to the previous screen.
- Click Next button on the "Add Account" window to add the account.
- Click Finish button.
You are now ready to use this alternate address as your "FROM" address when sending emails.
Send a message using your alternate address
- Before sending a message, click the From drop-down select box and select your alternate address from the list.
- When you are ready, click the Send button.
Note: When the recipient receives this message, the From and Reply-to addresses will be the alternate address.


