Topics Map > Ed Tech Tools > DIGITAL PROCTORING
Topics Map > Ed Tech Tools > RESPONDUS (EXAM MANAGER)
Topics Map > Ed Tech Tools > CANVAS > Respondus (Exam Manager)
Topics Map > Ed Tech Tools > CANVAS > Modules - Pages - Files
Topics Map > Ed Tech Tools > CANVAS > Quizzes - Classic Quizzes
Respondus 4 - Printing a Paper Exam
Respondus 4 allows you to format and print exams directly from the desktop software. Printed exams can converted to PDF documents.
Steps to Print
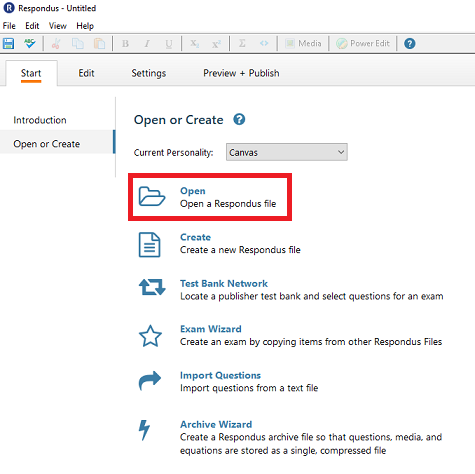
- Open Respondus. Then select the Open button.
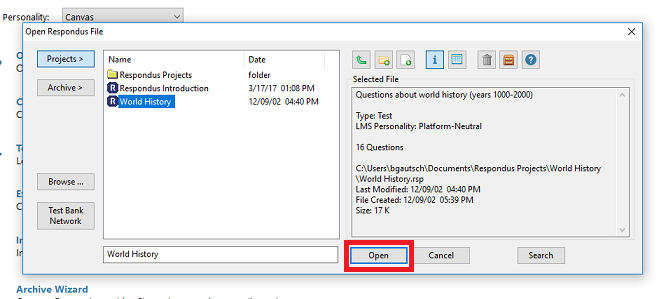
- Select the desired exam file in the file browser and click Open.
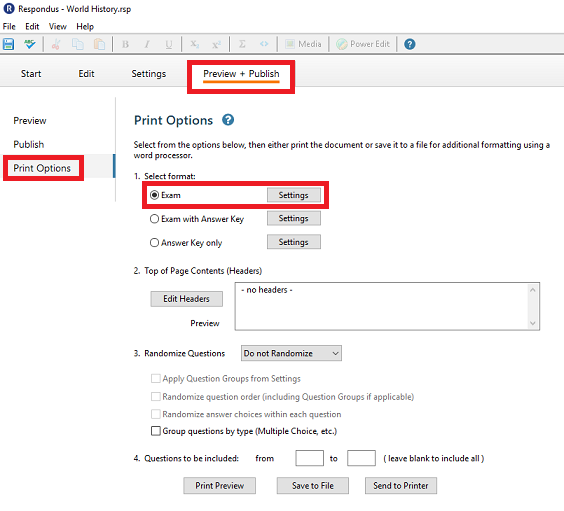
- Go to the Preview and Publish menu. Then select the Print Options tab.
- In the Print Options tab, there are three formatting templates to choose from:
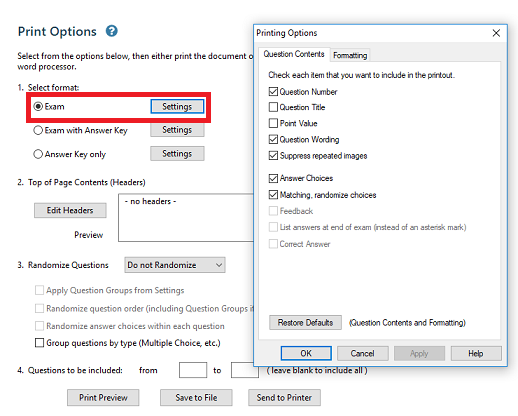
- Exam: Selecting the Exam Settings opens up the Printing Options window displayed in the screen shot below.
- Exam with Answer Key: Selecting the Exam with Answer Key Settings opens up the same Printing Options window displayed below but with the options include Feedback, List answers at the end of the exam, and to display the Correct Answers.
- Answer Key Only: Selecting the Answer Key Only Settings opens up the same Printing Options window displayed below but with options to show Question Title, Point Value, Question Wording, Matching Randomize Choices, and the way Correct Answers should be displayed.
- (Optional) Click the Settings button to modify template display options. Click the OK button to confirm changes.
- Select the Suppress Repeated Images button to prevent the same image from being used for multiple questions in a row.
- Select the Suppress Repeated Images button to prevent the same image from being used for multiple questions in a row.
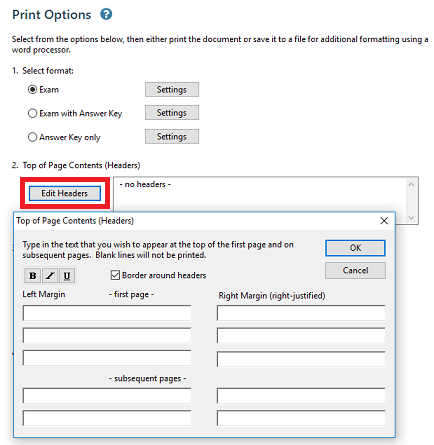
- (Optional) Click the Edit Headers button to enter customized information to appear at the top of each exam page.
- The next section allows up to 10 variations of the exam to be generated. There is an ability to "randomize all" questions in the exam or to have the questions randomized according to question type.
- If multiple exam variations are not needed, simply retain the "Original Order" option from the drop-down list.
- It is also possible to specify a range of questions to be included in the exam. If both fields are left blank, all questions will be included in the exam.
- At the bottom of the screen are three options: Text Preview, Save to File", and "Send to Printer".
- The "Text Preview" button shows a preview of the contents of the file in a pop-up window.
- The "Save to File" option allows the creation of a Microsoft Word file (.doc, .docx), a "rich text file" (.rtf), or a "standard text file" (.txt). The Microsoft Word and .rtf formats will retain enhanced formatting such as bold, italics, and underlining, whereas the .txt format will strip such information.
- Finally, the "Send to Printer" option allows exam printing directly from Respondus 4.


