Canvas - How to Create a Blueprint Course
What is a Blueprint course?
Blueprint courses are Sandbox courses that are associated with multiple courses. Once information is placed in a Blank or Sandbox course, the information may be "pushed" or "sideloaded" from the Blueprint course to the associated courses. Students cannot be enrolled into Blueprint courses. Blueprint courses are typically converted from existing Sandbox or Blank courses.
Part 1: Enabling a sandbox or blank course as a Blueprint course
Once the course has been setup as intended, the course can then be enabled to be a Blueprint course.
To enable the Blueprint course option:
- Login to Canvas.
- Select the sandbox or blank course that contains the Blueprint content.
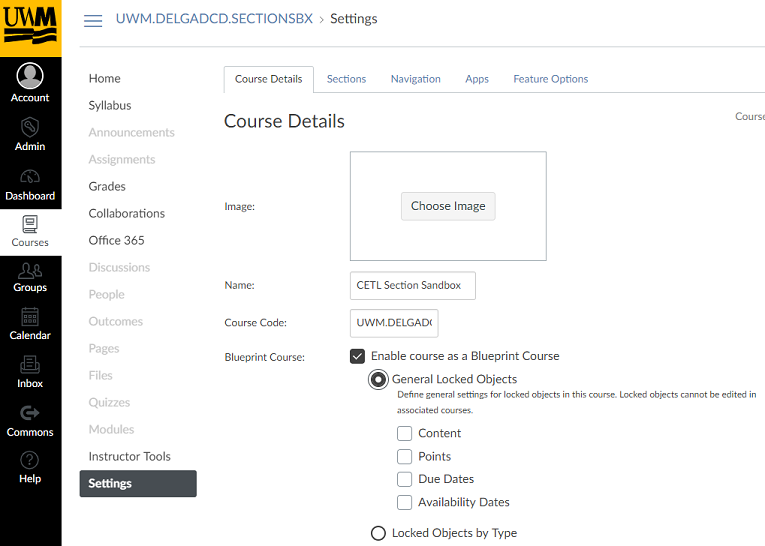
- In the designated course, select "Settings" in the navigation bar on the left side of the screen.
- In the "Course Details" tab, select the check box called "Enable course as a Blueprint Course."
- Once the Blueprint box is checked, this will prompt 4 options for "General Locked Objects" within the course.
- Locked objects are course settings and content that cannot be edited in the courses associated with the Blueprint course.
- A Blueprint course can lock "Content, Points, Due Dates, and Availability Dates."
- Select "Update Course Details" at the bottom of the page when the Blueprint has been configured.
Part 2: Switching the Blueprint course's sub-account
The Blueprint course must exist in a subaccount that has access to all applicable courses. Since Blueprint courses typically start as sandbox courses, they must be moved from the "Master" course area to the subaccount where the Blueprint's courses live.
- If the Blueprint course applies to multiple courses in one departmental subaccount, the Blueprint course should be moved to that department.
- If the Blueprint course applies to multiple courses in multiple departments in a school or college, the Blueprint course should be moved to the parent school or college.
- If the Blueprint course applies to multiple courses in multiple schools and colleges, the course should be moved to the subaccount above all schools and colleges.
These steps can be used to move the Blueprint to the appropriate subaccount. In some cases, support staff may be unable to move Blueprint courses. If you are unable to move the course, tag "@Canvas Team" in B59 for assistance.
- In the Blueprint course, go to Settings.
- In "Settings", under the Course Details tab, go to the "Subaccount" drop-down menu. The current sub-account will likely show "Any UWM department (Sandbox)." but may look different on the Continuing Education or Training and Development instances of Canvas.
- In the drop-down, navigate to to the top of the list of sub-accounts and select the top-most sub-account for the instance. For SIS courses, look for "UW-Milwaukee - Instructional Top Level."
- Note: A Blueprint course must be located above the courses it is associated with in the hierarchy of sub-accounts. Sandbox courses can not be in the "SIS Courses" sub-account.
- Respond to the request to move the blueprint course.
Part 3: Associating the Blueprint course with SIS courses
- Once the course has been enabled as a Blueprint, a blue tab will appear on the right side of the screen.
- This tab will appear on the right side of the course regardless of where you are within the course.
- Select the blueprint tab.
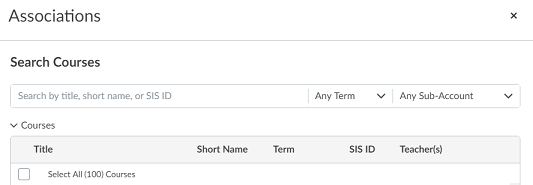
- In the blueprint tab, select "Associations."
- Associations will allow a blueprint course to be associated with as many courses as you choose.
- Note: A course can only receive one blueprint association.
- Search courses by title, class code, or semester.
- Select the checkbox for each course that needs to be associated to the Blueprint and click "Save."


