(School of Education) Video Training Guide
- Preparing For Recording
- Recording Video
- Moving Files From Recording Device To Computer
- Cutting Video Clips
- Compressing & Saving Videos
_____________________________________________________________________
Preparing For Recording
Requirements
- Recording Device
- Computer with Windows Movie Maker
What recording device should you use?
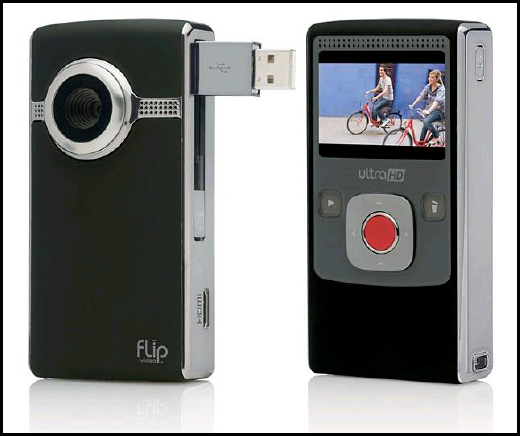
- Flip UltraHD Digital Camcorder
- Apple Device (iPhone, iPad, etc.)
- Smart Phone
Where can you get these devices?
If you don't have a Smart Phone, you can check out a Flip Camera or an Apple iPad from the Media & Reserve Library in the lower level of the West Wing of the Library. Devices can be checked out for two days. To check out a device you just need to provide your UWM ID.
The Media & Reserve Library Hours are: (Hours subject to change)
Contact the Media & Reserve Library:
- Phone: (414) 229 - 4673
- Email: libmedia@uwm.edu
For More Information See Link Below:
What if your computer does not have windows movie maker?
- Download here.
What if you do not have a computer?
- If you don't have a computer you can visit one of the Campus Computer Labs or check one out from the Media & Reserve Library. See the link below for more information on Computer Labs on Campus
- Campus Computer Lab locations
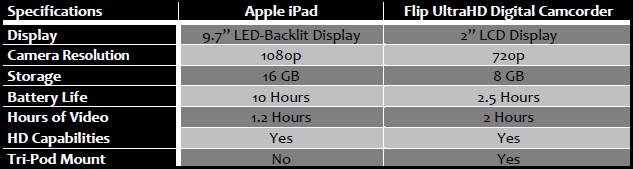
Device Comparison Sheet: Apple iPad vs. Flip UltraHD Digital Camcorder.
_____________________________________________________________________
Recording Video
Flip UltraHD Camera
1. To begin recording on the Flip Camera, you first need to turn it on. This is done by pressing the Power button on the side of the device.
2. Then, to begin recording, you need to press the red record button in the center of the camera. This will start and stop the video.
Apple Device
- Open the Camera App.
- In order to record, you need to slide the screen so that the yellow highlights video instead of photo.
- Once video is highlighted, simply press the red button to start recording. This button will start and stop the video.

_____________________________________________________________________
Moving Files From Recording Device To Computer
Flip UltraHD Video Camera
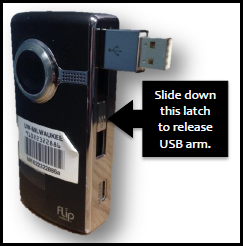
1. Connect the Flip Camera to the computer. To do this, slide the latch down on the side of the camera to release the USB arm.
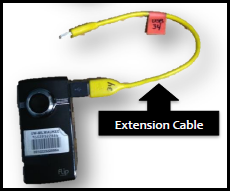
2. Next you need to plug the USB arm into your computer. You can insert the USB arm directly into a USB port on your computer however, if it doesn't fit, you may need to use the extension cable provided by the library. Once you've connected the Flip Camera, the screen should read Connected
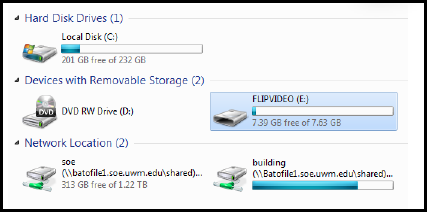
3. Go to the Start Menu, on the right menu, click Computer. You should see FLIPVIDEO listed as a drive. Double click to open.
4. Inside the FLIPVIDEO drive, open the DCIM folder. Then open the 100VIDEO folder to see your video(s).
5. Right click the video thumbnail and click Copy. Paste wherever you would like the file to be located on your computer.
6. Your video is now saved to your computer and you can disconnect the Flip Camera. You might also want to consider saving you video file(s) elsewhere as well, like on a USB drive or an external hard drive. You can do this the same way as you did from the Flip Cam by copying and pasting.
Note: Be sure to delete the files off of the Flip Camera before you return it to the Library!
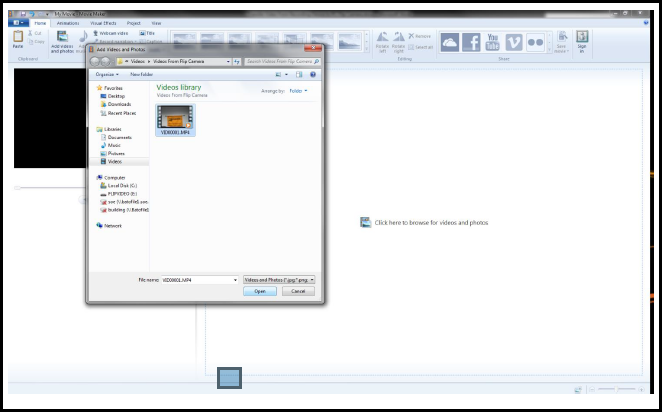
7. In order to edit you video file(s), you will need to import them into Windows Movie Maker. Open Windows Movie Maker.
8. Click the space labeled, Click here to browse for videos and photos. Select all files needed and click Open.
Apple Device
1. Connect the device to a USB port on your computer using the proper cable for your device.
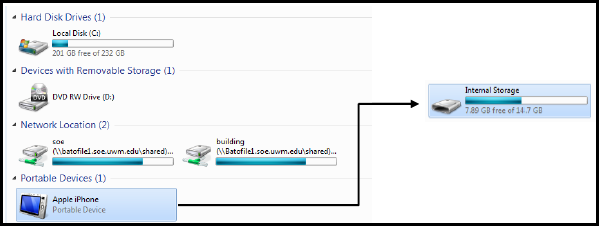
2. In the Start menu, click Computer. Under Portable Devices, double click your device. Then double click Internal Storage in the window that opens.
3. Inside the Internal Storage drive, double click the DCIM folder. In the next window, click through each of the folders to find the file that you are looking for.
4. Right click the file you wish to copy to your computer and select Copy. Then Paste the file wherever you wish for it to be stored on your computer.
5. You video is now saved to your computer and you can disconnect your Apple Device. You might also want to consider saving your video file(s) elsewhere as well, like on a USB drive or an external hard drive. You can do this the same way as you did from the Apple Device by copying and pasting.
Note: If you borrowed an iPad from the Library be sure to delete the files off of the device before you return it!
6. In order to edit you video file(s), you will need to import them into Windows Movie Maker. Open Windows Movie Maker.
7. Click the space labeled, Click here to browse for videos and photos. Select all files needed and click Open.
_____________________________________________________________________
Cutting Video Clips
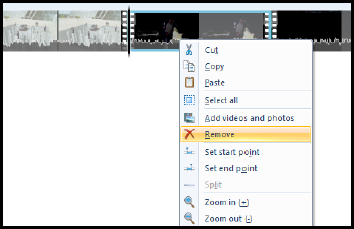
1. The first thing you need to do is decide where you want to cut the video. To do this, you can drag the black bar to the position in the video where you wish to split.
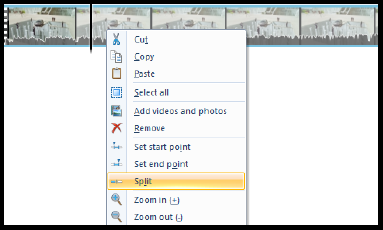
2. To make the cut, right click on the video. In the menu that appears, select Split. The video should split at the position where the black bar was placed.
3. You can repeat this process as many times within one or several video clips until you are satisfied. If you split a video, and don't want one of the clips created, you can remove it either by clicking on the clip and hitting the Delete key or right clicking and selecting Remove.

_____________________________________________________________________
Compressing & Saving Videos
For information on compressing and saving videos, click here.
_____________________________________________________________________