Office 365 (Outlook on the web) - Working with mail folders
- Default folders
- Right-click menu for folders
- Creating folders
- Moving folders
- Important considerations when managing folders/emails
- The Deleted Items folder
- Favorites
- What else do I need to know?
Default folders
Your account starts with these default folders:
- Inbox - Incoming messages arrive in your Inbox unless you've created an Inbox rule to redirect them to another folder, or they're identified as junk email.
- Drafts - If you create or respond to a message, but can't finish it right away, it will automatically be saved to your Drafts folder. You can come back to the message later to continue editing it, and then send it.
- Sent Items - By default, a copy of every message you send is put in your Sent Items folder.
- Deleted Items - When you delete a message, it's moved to the Deleted Items folder.
- Junk Email - Messages that have junk email characteristics but that aren't blocked by a spam filter before they reach your mailbox will automatically be moved to this folder.
- Notes - This is a read-only folder. You must use Outlook to create or edit items in this folder.
You may see other folders that have been created by your administrator.
Right-click menu for folders
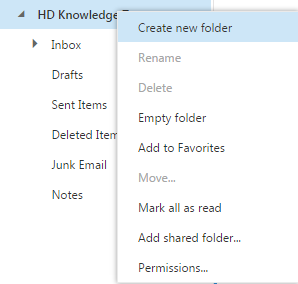
Most of what you can do with a folder will be found in the right-click menu. Actions you can take include:
- Create new folder - Use this to create a new subfolder in the folder you right-clicked.
- Rename - Rename the folder. You can't rename the default folders, such as the Inbox folder.
- Delete - Delete the entire folder. Delete will move the folder to the Deleted Items folder.
- Empty - Deletes everything in the folder, including any subfolders.
- Add to Favorites - Adds the current folder to your Favorites.
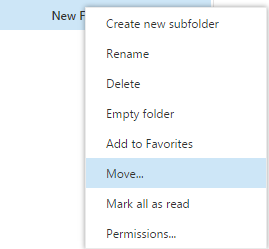
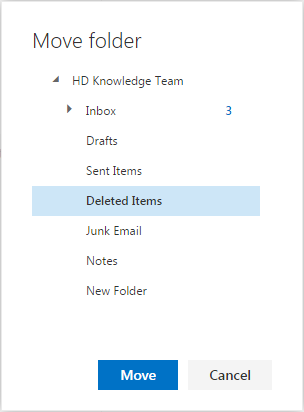
- Move - Opens a window where you can select a folder to move this folder to. You can also move a folder by clicking it and dragging it to where you want it.
- Mark all as read - Marks every item in the folder as read.
- Assign policy - This feature may not be available to you. If it is, you can use it to assign a retention or archive policy to messages in the folder.
Creating folders
You can create additional folders to organize your messages any way you want. For example, you can create a folder for a specific project, or for all messages sent by a particular person, or all messages sent to a distribution group that you're a member of.
To create a new folder, right-click the parent folder you want to create the new folder in. If you want a top-level folder (a folder at the same level as your Inbox), you would use your mailbox as the parent folder.
To create a folder:
- Right-click on your account.
- Click create new folder.
- Type the name you want to use for this folder.
- Press Enter or click away.
Note: It is recommended you not create sub-folders under your Inbox.
Moving folders
There are two ways to move a folder.
- Click the folder you want to move and drag it to where you want it.
- A. Right-click the folder you want to move and click Move.
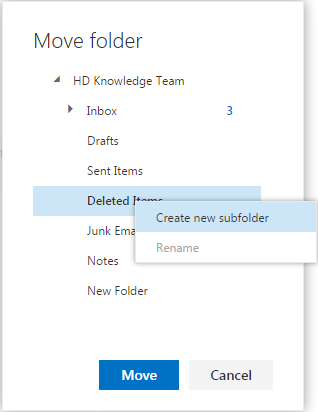
B. A window will pop up that you can use to choose what folder to move the folder into. Click the folder you want to move to and click Move. Or click Cancel to close the move folder window without moving the folder.
Important considerations when managing folders/emails
- A folder (including all emails) can only be moved to another location. It cannot be copied.
- When moving/copying folders/emails to another location, be patient. There may be times when you will need to wait a certain amount of time before the move/copy completes.
- Important: Do not quit out of the application until you have verified the move/copy command has completed.
- If you want to move/copy a sub-set of emails to another location, you can use the CTRL or Shift-click actions to select the desired email messages.
- Note: During our testing, we have noticed inconsistencies when attempting to use CTRL or Shift-click actions to select the desired email messages. If the range of messages you are attempting to select is large, you may not be able to select them. You will need to select a smaller range of messages.
- When scrolling through a folder with a large number of messages, the web user may require some time to show you the messages within the folder listing. Please be patient.
The Deleted Items folder
When you delete a message, it's first moved to the Deleted Items folder. You can either let messages stay there, or you can set Outlook on the web to automatically empty your Deleted Items folder when you sign out. Your administrator may have set up a policy to empty items from your Deleted Items folder after they've been there for a preset number of days. For example, there may be a policy that removes anything that's been in your Deleted Items folder for 30 days.
Recover deleted items
If your administrator has enabled the recover deleted items feature, you can use it to recover items that have been deleted from your Deleted Items folder. How long items will be recoverable depends on settings that are controlled by your administrator.
- Right-click Deleted Items.
- Click Recover deleted items.
- Right-click the item you want and then click Recover. The item will be moved to its default location. Messages will go to your Inbox, calendar items will go to your Calendar, contacts to your Contacts folder, and tasks to your Tasks folder.
You can also select Purge to permanently delete an item. If you purge an item, you won't be able to use Recover deleted items to get it back. Purging a message won't remove it from any backups that were made before you purged it.
Favorites
It's not unusual to end up with so many folders that it can be hard to keep track of the folders that are most important to you. To make it easier to keep track of those folders, you can add them to your Favorites. Favorites don't appear in your folder list until you've added at least one folder to Favorites. Adding a folder to Favorites doesn't move the folder, but creates a link to it.
- To add a folder to Favorites, right-click the folder and click Add to Favorites.
- You can re-order folders in Favorites by clicking and dragging, or by right-clicking and then clicking Move up in list or Move down in list.
- To remove a folder from Favorites, right-click it in Favorites and click Remove from Favorites. This only removes the link to the folder from Favorites; it won't delete the folder from your mailbox.
What else do I need to know?
- The folders you create can be at the same level as your default folders, for example, the Inbox or Sent Items folders. Or, you can create sub-folders within any existing email folder. It is recommended you not create sub-folders under your Inbox.
- You may need to refresh your browser to view a folder that you just created in the folder list.
- If you want to create a personal information folder as a subfolder to a mail folder, you can create the folder and then move it to the location you want. Some folders, for example, the Inbox, can't be moved to another location.
- Some folders, for example, the Inbox, can't be renamed. If the folder can't be renamed, the Rename option in the menu will appear dimmed.
- After you delete a folder, it's moved to the Deleted Items folder. The folder isn't permanently removed until you empty the Deleted Items folder or delete the folder from the Deleted Items folder.


